Groups allow you share and organize resources in a collaborative environment by creating groups.
TABLE OF CONTENTS
- If you have not been granted permission to Create a Group
- If you already have permission to Create a Group
If you have not been granted permission to Create a Group
- Login in.
- Select Groups in the primary navigation bar. Then select See all Groups.
- This will take you to the All Groups page, where you can select the Create a Group button.
- When you select Create a Group, you will be directed to fill in some information in a Request A Group Form.
- Now, you'll need to wait for a Site Admin to Review your Request
- Once a Site Admin has Approved you Request, you will either be able to greate your own Group, or one will be created for you.
If you already have permission to Create a Group
If you are given permission to create your own Group, you can follow the instructions below
- Login in.
- Select Groups in the primary navigation bar. Then select See all Groups.
- This will take you to the All Groups page, where you can select the Create a Group button.
- The Create group tool will guide you through the process of naming and describing your group.
- Enter a descriptive name of your group, and select what type of group it is: General, Instructors, Students, or Administrators.
- Click Next: Describe button.
- Enter the group’s Subject and Grade Levels. - This will help other users find and connect through your group.
- Click Next: Describe.
- Enter the group’s description or purpose of the work. - This description will appear at the top of your group page.
- Click the Next: Permissions button.
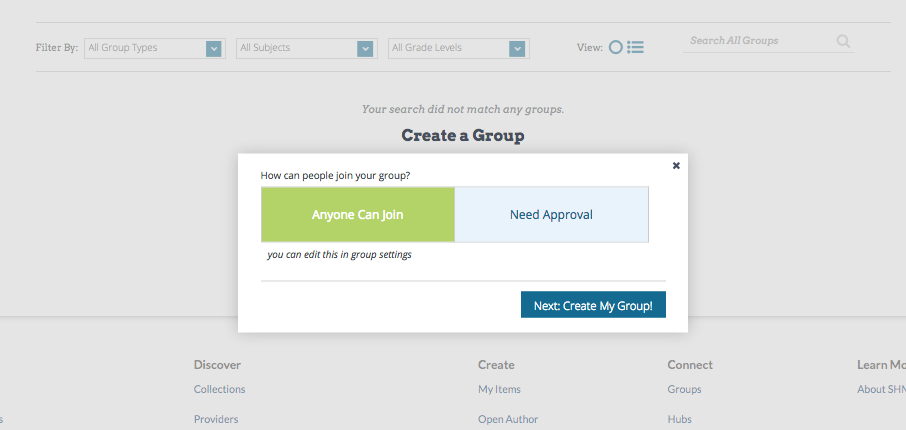
- Set permissions for who can join your group. Click either the Anyone Can Join or the Need Approval button.
- If you select Need Approval then users will request to join the group and you will be notified by email. You can choose to approve or deny their membership in your group.
- If you select Need Approval then users will request to join the group and you will be notified by email. You can choose to approve or deny their membership in your group.
- Click Next: Create My Group!
- Enter a descriptive name of your group, and select what type of group it is: General, Instructors, Students, or Administrators.
Once you select Next: Create My Group! your group is created. You are now ready to add content and invite members.
Note that your group description and information (including your personal group cover image) can be edited at any time by selecting the Manage Group option.